How to feel like a superhero in New York (guest post from Mark Lynch)
A note from me, Keren, before I hand over to Mark.
I met Mark at JFK Airport, we randomly started talking, and he was on the same flight as JP and I – heading back to London. Turns out, he had also been to Comic Con (what, you didn’t know about me going to Comic Con? Check out my post about it here).
My incessant questions ended up with me being told a fascinating story about how Mark became Spiderman. I told him – you have to send me this in writing so I can put this on my blog! And so he did! See above:
The beginning
Back in April of this year, my friend Matt and I decided to go on the trip of a lifetime and take in the New York Comic Con happening during October 11th-14th. We booked tickets for the Saturday. Staying in Manhattan from Friday to Monday.
I was training myself back to fitness after having let myself go rather badly in recent years. The results of said training were going very well and I started thinking about wearing a costume to the event.
My all-time favourite superhero is Spider-Man and I thought with a bit more dedication to my training, I might just be able to pull off the look.
Found a reasonable costume from a web site called Zentai Zone. A fully custom sized suit is possible if you take something like 15 or 16 measurements and send them in along with your order. So, that is what I did.
In the meantime, I gave thought as to how I might make some improvements to the outfit without spending a lot of money.
The obvious improvements were replacing the eye lenses and doing something with the feet of the suit so that I would not be bare footed within it.
Improving the suit
After a fair amount of research into what others had done, I decided to make replacement lenses out of old metal speaker grilles which were cut to fit into the lens cut outs on the mask and bent to the shape of my face. The outside was painted white and the inside, black. Which would help with seeing through the myriad of tiny holes. These metal lenses were then sandwiched between an inner and outer layer of clear PVC with some overlap past the metal to allow the PCV to be glued together, making a sealed unit. These eye lenses were then inserted and glued into the eye pockets of the mask, where I had previously removed the existing white scrim by unpicking the stitching.
The boot area was improved by buying a cheap pair of cloth shoes from Primark, cutting away any extraneous material and inserting them into the foot area of the costume, making sure they were correctly positioned.
Some days later I was in a Halfords store, buying some bits for my car and I stumbled across their car mats section. In which I found a budget car mat for under £5 which was simply a rubber mat with ribbing and plain black in colour. I had the idea that if I turned the car mat upside down so that the ribs were facing down and I then put the costume on with the shoes inserted. I could then stand on the mat, draw around my feet with a marker pen, cut the shape out and then glue these to the underside of the foot of the costume to 1) Protect the material and 2) Give me some much needed traction.
Both of the above worked quite well.
How about a face shell then?
However, I was not completely happy with how the mask looked on me. It was possible to discern some facial features through the material. In the comic books and indeed, the movies, these features were never seen. Obviously in a comic book, the artist usually opts not to draw facial features and in the movies, a face shell is used to give a uniform look to the head so that whether there is the actor or a stunt person wearing the suit, it matters not. And thus helps the audience to suspend their disbelief.
I looked into purchasing a face shell from a supplier on a web site known as “The RPF”, several things became apparent. Firstly, they were quite expensive, as delivery was from the USA. Secondly delivery time was a factor and lastly, I was not sure how well it would fit my face.

Make your own. How hard can it be?
I decided to try and make my own face shell.
Again a fair amount of research was made. In the end I elected to make a silicone mould of my entire head and neck. This would be supported with the use of plaster of paris bandages. Once this was done I would have a negative mould of my head and neck which could then have plaster of paris poured into it to create a life size positive cast.
A good friend of mine helped me with this process and during the course of a Saturday we got this done. It was a weird feeling, having most of your senses cut off due to having one’s head completely ensconced in silicone and plaster bandages over the course of several hours.
The entire head moulding process took around 6.5 hours.
Although anyone that actually knew what they were doing, could probably have made it in half the time!
I took a cast about two weeks later, it came out fairly well with a number of imperfections which I was able to simply sand away. Although my ears did break off(!) when I was removing the silicone.
I left the plaster cast to set for a week and during that time I decided upon the best process to use to construct a face shell. My decision was to use cling film, papier-mâché and car filler, in that order, to make my mask.
The cling film was wrapped around the plaster cast quite tightly to smooth out some of the facial features, like nose, mouth and ears. To stiffen up these new contours, several layers of papier-mâché were applied and left to dry for 24 hours.
The costume mask was then fitted over the bust and the eye holes were drawn out with a marker pen. I would then cut out sticky backed foam draught excluder to place around the eye holes so that as the face shell was constructed with the car filler, the eye holes would be created exactly the correct shape and size.
A ring of the same sticky foam was applied around the neck to give an end line for the shell.
Many “happy” hours were then spent over the next couple of days.
Building up the filler in several layers until the requisite thickness was achieved. Followed by many “not so happy” hours of sanding down by hand to get the required shell shape. Followed by more filling and sanding.
After that, it was a matter of applying grey primer and then a top coat of red gloss.
The final steps were to cut the shell in half from approximately the front of the ear, up and around, going down to the opposite ear. This allows the shell to be removed from the plaster cast of my face.
Another idea, which I got from studying the shells used in the Spider-Man movies, was to cut a section out around the chin area which would then allow said area to move. Elastic strips were employed in the chin section to ensure the chin piece returned to its closed position. Some plastic strips were also on the top of the shell to join the two halves together and act as a hinge too.
Some sticky back velcro was used at the bottom of the shell where the two halves come together.
Total time spent on this was probably around 22 hours of actual working time.
Getting done in time for New York
Finished the face shell with just less than two days before I was due to fly to New York for the Comic Con. I believe in cutting it close!

On the day
Face shell and costume went together reasonably well and on Saturday the 12th of October 2013, Matt and I (wearing the costume) left the hotel and almost immediately this somewhat elderly coloured guy, who was either drunk, stoned or both! Shouted “Yo, Spider-Man!” and began to sing the theme tune from the 1960`s cartoon. Even as we crossed the street, he was still belting out the tune. It was hilarious and a good start which made me feel a lot less self-conscious.
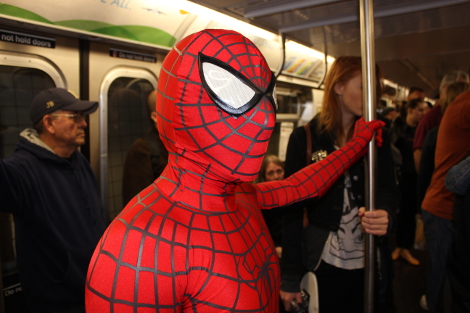
We continued our walk of two blocks over to 50th Street Station in order to hop onto the Subway and ride a few stops to 34th Street Penn Station, so that I could pull a couple of poses on the train. Like hanging sideways on a vertical pole and upside down on a horizontal one. Luckily, I had already practised these at my gym!
Unfortunately, the car was far too crowded and it was not possible to do this. I had to be content with a couple of snaps just standing in the train.
The journey to and from the station to the Jacob Javits Center was really interesting as quite a few people wanted to pose with me for photographs or just take a photo.
One of the most interesting was a guy who literally ran up to us and said he was the Sci-Fi Network and wanted to take a few photos. He took one of me making a pose and another just standing normally.
Inside Comic Con it was awesome
I lost count of the number that people that wanted to take a photo or have their kids pose with me for them to take a picture.
A couple of standout moments for me were when Batman (who was wearing a great suit) stopped me, complimented me on my suit and wanted to take a picture of me. The other was a little girl of around 3 or 4 years old, cute as a button, who got so excited seeing Spider-Man that she tripped over. She simply got up, dusted herself off, took her Mums hand and carried on. As they passed me and went off to the left, she turned around and shouted “I love you Spider-Man!” at the top of her voice and waved vigorously. I waved back just as vigorously.
A fantastic day and an awesome weekend in Manhattan.

What’s next then?
Having now got the bug(!) for costume wearing! I intend to get a far more movie accurate suit. Ideally I want one that is modelled on the costume in the next Spider-Man film which is coming out in April 2014 “The Amazing Spider-Man 2”
Their design is the best one I have seen. It even beats the Raimi suit, which was awesome in its own right.
San Diego Comic Con 2014 here I come? I hope so.